Enemies of many types run rampant within the Tower of Barbs. Some want to reach the top of the Tower; some consider the Tower their home; and some may not even be sentient. But they all have one thing in common: they want you dead.
Enemies are a significant source of Armor, Weapons, Kill Coins, EXP, and other Items.
Types Of Enemies[ | ]
Screamers[ | ]
Screamers are one of the most common enemies found in the Tower of Barbs. They attack you on sight and will investigate player-made gunshot sounds if they're within hearing range. However, they tend ignore other fighting sounds, even gunshots coming from fellow Screamers, which makes them pretty easy to sneak-attack. Screamers with ranged weapons will keep some distance from you, but they're easy to bait around corners by breaking line of sight.
Tubers[ | ]

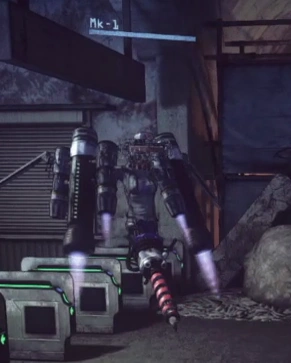
Mk-1 Scratch Tuber
Mk-1 Hovering Tuber
Tubers are strange, machine-like enemies originally created by Yotsuyama Bionics. Tubers come in various models that present unique challenges in battle, as well as various difficulty levels, represented by an Mk- number above their names. Most Tubers have a chance to drop a specific rare metal.
- Scratch Tuber: Slow, human-sized, has long metal claws. Scratch Tubers can deal a lot of damage but they're generally easy to dodge.
- Chance to drop Scratch Metal.
- Hovering Tuber: Floats, possesses homing projectiles and a strong drill weapon. Hovering Tubers can execute a powerful downward drill attack, but they get stuck in the ground if they miss. Dodge-roll out of harm's way then attack while they're vulnerable.
- Chance to drop Hovering Metal.
- Bullet Tuber: Humanoid Tuber with extremely dangerous weaponry. From afar, Bullet Tubers will use a laser to aim their machine gun; up close, they'll fire a deadly flamethrower if not killed fast enough. They make no sound, meaning they can easily sneak up and take out a careless Fighter. They are also unable to jump, making escape (if necessary) relatively easy.
- Chance to drop Bullet Metal.
- Bone Tuber: Wiry and extremely fast. Bone Tubers can dash up close from far away almost instantly. They possess a quick spinning attack, a double slashing attack, and a strong rolling attack. They're only vulnerable after attacking, so bait them and get out of the way.
- Chance to drop Bone Metal
- Reversal Tuber: Large, mecha-like Tuber with powerful arms and a shield. Moves slowly but turns quickly, and can punch or perform an earthquake AoE. It is only vulnerable to damage dealt to the back.
- Chance to drop Reversal Metal
- Treasure Tuber: On a motor-bike. Treasure Tubers will flee when seeing the player. After receiving damage it will attempt to self-destruct in an explosion; attack it to knock it down, then quickly Press X over it to stomp and kill it for a Gold Chest. These Tubers are incredibly rare and can replace any other Tuber on a floor. When looking for Treasure Tubers, you can repeatedly enter and leave a floor via an escalator for more chances at a regular Tuber being replaced.
Haters and Hunters[ | ]
Haters and Hunters are other players' Fighters found within the Tower of Barbs. They are usually significantly stronger and smarter than Screamers or Tubers; the are the only source of SPLithium in the tower and may even drop faction metals germane to the current floor. When you get close to a player Haters' location, they "activate" and autonomously attack any nearby Screamers or Tubers, and any nearby Screamers or Tubers autonomously attack them. They're often loud enough to hear from a distance; even unprovoked, they often curse to themselves or scream where they stand.
- Haters: A player's Fighter who died on that floor or nearby. This includes your own dead Fighters which you can defeat to reclaim. (Be warn that retrieving your fighter this way removes all items from their death bag. But if your hater dies from damage other than from your own current fighter, the hater is not salvaged and will respawn again.) The highest level Haters can spawn depends on your current floor level; Haters' level and grade cannot exceed what Fighters could have been unlocked at a given floor. Haters' names are displayed in orange text.
- Developer Haters, signified by the "YTYMk-" at the beginning of their name, can sometimes spawn. They may be significantly stronger than typical player Haters. Between floor 11 and floor 30, some developer haters named "YTYM@CHARGERS" (aka: Charger Haters) may drop unique Blueprints. Unlike player Haters, developer Haters do not autonomously attack Screamers or Tubers, and any nearby Screamers or Tubers do not autonomously attack them.
- Hardcore Haters: Special Haters that appear on floors 42-49, recognized by having a red nameplate. They highly resist Poison, taking only 1 tick and will never stop to puke. Upon defeat they can spawn a silver or gold chest containing a Tuber Metal or Faction Metal.
- Hunters: Fighters that have been sent after you by another player through the expedition menu. Hunters' names are displayed in red text and are accompanied by a warning when you enter a floor they're spawned on. They spawn in the same locations as any other Hater would spawn in for a given floor, and the Hunter will continue to spawn for an hour or until they or you die from any damage.
- Hunters are often sent out naked by players to get expedition rewards without hurting other players, but when fully equipped they can be very dangerous. After dying to a Hunter, the other player will appear in the revenge tab of your expedition menu, allowing you to send a Hunter after them. Dying to a Hunter may allow the player who owns that Hunter to retrieve a random item from your death bag. Players may also show up in the Revenge Tab when they are in your TDM revenge tab. Players can send hunters to other random players whose highest grade fighter ever bought matches the highest grade fighter they ever bought, a fighter of that grade is in the tower, and the player who is about to send the Hunter has reached that floor level or above. Revenge tab bypasses this requirement.
Mid-Bosses[ | ]
Mid-bosses are powerful creatures encountered in specific rooms on specific floors. Upon entering a boss room and triggering a mid-boss's cutscene, all room exits are sealed until the fight ends. Defeating a mid-boss will usually unlock a number of gates required to reach certain floors, as well as the escalator up to the following floor. Mid-bosses have a high chance to drop Faction Metals based on their type (D.O.D. ARMS, War Ensemble, Candle Wolf, or M.I.L.K.) and the color tier of the floor (Blue, Green, Black, or Red). They can also drop equipment or Kill Coins instead. Faction Metals are necessary for upgrading Weapons and Armor, and fighting mid-bosses is one of only four ways to get them (the others being Quests, Gold Chests often found in Trap Rooms, and occasionally as Uncle Prime rewards).
| Mid-boss | Faction Metal | Vulnerability | Encounters |
|---|---|---|---|
| COEN | D.O.D. ARMS | 3F Tamata
26F Oshimi 34F Nitanda | |
| JIN-DIE | War Ensemble | 6F Moka-Magome
16F Kaga 26F Shimemeno 38F Ebata | |
| GOTO-9 | Candle Wolf | 11F Maka-Tsutsumi
23F Echizen-Jima 36F Itanodai | |
| U-10 | M.I.L.K. | 32F Katsuma |
Dons[ | ]
Dons are the big bosses of the Tower. Each Don presides over a set of ten floors (also known as a district), and defeating each is required to progress to the next set of floors. Thankfully, simply proceeding to a Don's floor won't start their fight; Uncle Death will present you with a big button first, and pressing that button begins the fight.
The Dons' stories are told in issues of Tales From The Barbs. The pages of each issue are scattered throughout the corresponding district.
| Don | Encounters |
|---|---|
| Max Sharp | 10F Shimo-Omeno |
| Colonel Jackson | 20F Hachiyanma |
| Crowley | 30F Saigetsu |
| Taro Gunkanyama | 40F Futagi |
Jackals[ | ]
The Jackals are the 3 elite body collectors employed by the Dons of the tower. They collect bodies and equipment to sell and thus "have the best equipment money can buy", they appear after some time when all enemies are dead on a floor, or just enough time has passed. Being level 200, they are not to be taken lightly and often the best tactic is to run. They teleport in after a very distinct siren goes off. If you are killed by one, there is no option to revive, that fighter must be defeated as a hater or salvaged. They can drop their equipment if you decide to fight them and win.
The Forcemen[ | ]
A group of 4 powerful bosses that appear as challenges on their own floors. Having their own unique equipment, they arent to be taken lightly. Each one of the Forcemen represents one faction of the Tower's Dons.
| Forcemen | Faction |
|---|---|
| White Steel | D.O.D. ARMS |
| Red Napalm | War Ensemble |
| Black Thunder | Candle Wolf |
| Pale Wind | M.I.L.K. |